
In the past few days I’ve been working in manual mode on multiple linux boxes simultaneously. I have to follow logs, modify configurations and kill/start applications all at once. I got confused pretty fast of what server am I connected to in a certain console pane, and where are my operations. On top of that my ISP had a huge traffic hit these days, and my VPN connection dropped constantly. I dusted off my knowledge about some tools that boosted my productivity.
I usually don’t like to repeat myself, and supposedly I’ll have to do these modifications for many more machines. So as I see something is working, I take a note of the solution and create a script as I go. I have to see that it works manually, in order to automatize it.
SSH
SSH provides secure shell connection to a remote machine. You can work in it just like your local machine. There are multiple authentication methods, I found ssh public key auth feasible in my use case.
- put ssh keys into
authorized-keysof the remote user simply, if you already have access to the serverssh-copy-id <connection>
- sshpass make it easy to use
ssh-copy-idin a scriptsshpass -p $secretpass ssh-copy-id <connection>
- remember the passphrases of the ssh keys
ssh-add -K ${key_location}
- ssh port forward
ssh -N -L LOCAL_PORT:localhost:REMOTE_PORT <connection>
- copy keys to the server
scp ~/.ssh/my_keyprefix_* '<connection>:~/.ssh/'
- start ssh service
sudo systemctl start ssh.service
- attach to the already existing byobu session (see below):
ssh -t byobu
Where <connection> is the data necessary to establish the ssh connection.
Most likely an identity file and the server address: -i ~/.ssh/my_keyprefix.pem user@192.168.1.101.
I think it’s better to use SSH Config.
If you specify Host myserver in the config, you can use case myserver for the <connection> part.
SSH Permissions
SSH is picky with the permission settings.
- The home folder that contains
.sshfolder can not have group write permission. .sshfolder should have700octal permission.ssh/authorized_keysand public keys should have644octal permission.ssh/configshould have600octal permission- private keys under
.ssh/should have600octal permission
Permission basics
Octal permissions in linux specify the permissions of the owner, group and others as the numbers respectively.
The permissions can be any combination of: read (4), write (2) and execute (1).
With that in mind: 644 permission means read permission for everyone, and an extra write permission for the owner.
Permissions can be set with chmod command like: chmod $octal_permission filelist.
SSH Config
I think it’s amazing that you can collect ssh configurations under a custom name, and you can use that name to connect to the specified server.
You need to set the necessary data into:~/.ssh/config.
Host server-1
    User customuser
    HostName 192.168.42.123
    IdentityFile /var/opt/customdata/.ssh/id_ed25519
I used rsync to keep some code up to date in my systems, and it made the code significantly easier and less error prone to reference the ssh config already set, instead of typing it out.
Rsync does not proide automatic resync out of the box, but a little bash magic can do wonders.
projectpath="~/projects/thisproject"
machine="server-1" # this is the Host in .ssh/config
run_rsync() {
  rsync -azuv --no-o --no-g \
    --exclude "logs" \
    --exclude ".git" \
    "${projectpath}" \
    "$machine":/opt
}
run_rsync; fswatch -o "${projectpath}" | \
    while read f; do run_rsync; done
Debug SSH connection problems
You can debug ssh issues with the verbose flag on the client side, e.g: ssh -vvv server-1.
If you need to debug your issues on the server side, you can set the ssh service to print debug logs by setting LogLevel DEBUG in /etc/ssh/sshd_config. You need to restart the sshd service to apply this modification. systemctl restart sshd
View the logs with e.g: journalctl -f -u sshd.
In my case I needed to access a user that had his home folder outside /home AND had his password locked.
On top of that their home folder had group write permissions by default.
Such a thrill.
Locked password
The locked password made it harder to put out the ssh key, there are 2 simple solutions to choose from
One would be to set a password manually with: passwd customuser as a root user, then use ssh=copy-id as usual, and finally lock the password again with passwd --lock customuser.
The other solution is to append the public key manually to ~customuser/.ssh/authorized_keys.
Home folder outside /home
In my case selinux did not know that this folder can be used as an ssh_home folder. These few lines permanently fixed it.
sudo semanage fcontext -a -t ssh_home_t ~customuser/.ssh/authorized_keys
sudo semanage fcontext -a -t ssh_home_t ~customuser/.ssh
sudo restorecon -R -v ~customuser/.ssh/
chmod g-w ~customuser
Welcome message
When I log in to a box, I found it beneficial to print a huge unique identifier of where I logged in exactly. It made it easier to keep track of what’s happening.
I found a great tool called FIGlet, that can generate ASCII art like text from ordinary text. As a small practice project, in my free time I put together a simple webapp to showcase an already existing JS renderer.
  ____   _____  ____ __     __ _____  ____            _
 / ___| | ____||  _ \\ \   / /| ____||  _ \          / |
 \___ \ |  _|  | |_) |\ \ / / |  _|  | |_) |  _____  | |
  ___) || |___ |  _ <  \ V /  | |___ |  _ <  |_____| | |
 |____/ |_____||_| \_\  \_/   |_____||_| \_\         |_|
But of course I could have just used cowsay.
 ________________________________
< Welcome to St. James Ballroom! >
 --------------------------------
        \   ^__^
         \  (oo)\_______
            (__)\       )\/\
                ||----w |
                ||     ||
Terminal multiplexers
Terminal multiplexers make it easy to manage long running processes in remote machines. They’re especially useful if you have an unreliable network connection, you can start up a session in the remote machine, and when you log in to the machine the next time, you can connect to the same session.
They let you create multiple windows/panes, thus provide a better experience than forward/background jobs.
You can have multiple sessions in a machine at a given time, multiple users can log in to them.
You can use it in your local machine as well, and log in to it from multiple shell emulators if that’s what you need.
Screen and tmux
GNU screen is there since 1987, widely available.
screen -S sessionName       # create session with a name
screen -r sessionName       # reconnect to named session
screen -ls                  # list current sessions
screen -XS sessionName quit # terminate session
screen -r -d                # reconnect to the last session
screen -xr                  # share screen
tmux is newer, created in 2007, has a huge community around it. They operate with key chords, both have a meta character that marks the actions for the multiplexer.
tmux new -s session_name            # create session with a name
tmux attach-session -t session_name # reconnect to named session
tmux ls                             # list current sessions
tmux kill-session -t session_name   # terminate session
tmux new -As0              # attach to default session if exists
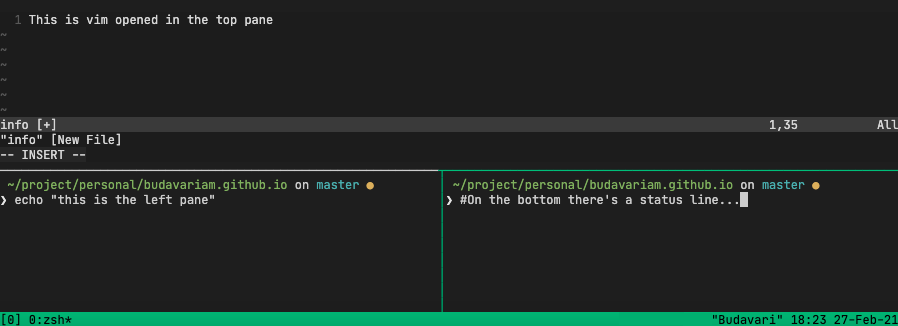
Byobu
My favourite is byobu, it’s a config layer over the other two above. It provides a simple interface for their functionalities. Byobu maps its functionality to the F1-F12 keys.
You can use the key chords that you’re used to, even select the underlying backend on start.
byobu
byobu-screen  # any tmux options can be given
byobu-tmux    # any screen options can be given
Basic Keybinding comparison
| Byobu | Tmux | Screen | Description |
|---|---|---|---|
| CTRL+b | CTRL-a | default meta | |
| shift+F1 | meta ? | meta ? | help |
| F6 | meta d | meta d | detach from session |
| F2 | meta c | meta CTRL-C | create new tab |
| meta w | meta " | choose tab from a list | |
| F3 | meta n | meta CTRL-N | next tab |
| F4 | meta p | meta CTRL-P | prev tab |
| meta 0 | meta CTRL-0 | switch to tab (0 can be any number) | |
| shift+F2 | meta " | meta SHIFT-s | split horizontally |
| CTRL+F2 | meta % | meta | | split vertically |
| meta o | meta TAB | switch to pane | |
| meta x | meta SHIFT-x | close the pane that has focus | |
| F8 | meta , | meta SHIFT-a | rename tab |
| F7 | meta [ | meta ESC | start scroll mode |
| meta q | show pane numbers if you press a number the cursor will jump to it | ||
| meta ; | toggle between prev/current pane | ||
| meta SPACE | toggle between layouts | ||
| meta z | toggle zoom to pane |
Note that Byobu can use the underlying backend’s keybindings as well.
Happy coding!