
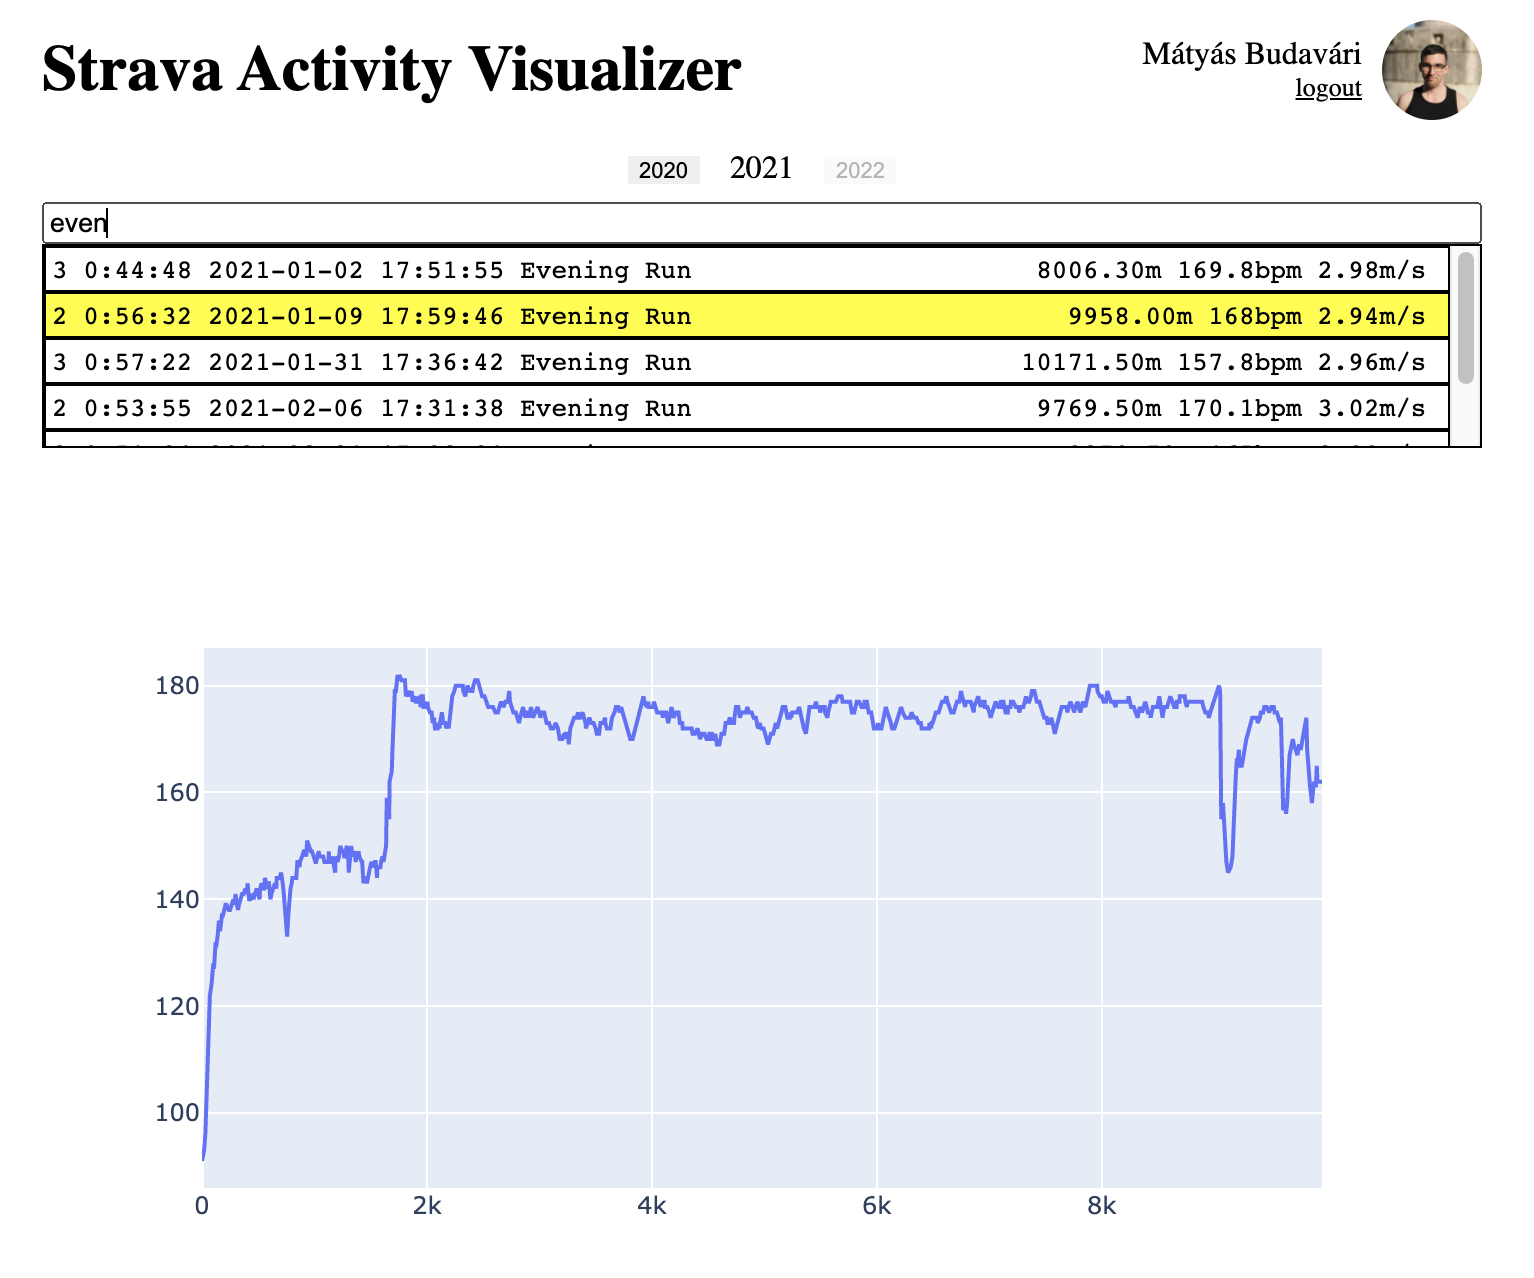
I started to run on a weekly basis in last August, I’m fascinated with the data I can collect from each run. I’ve been using Strava ever since. While I was preparing for my previous post about plotly-dash, I decided to dust off my knowledge by creating a simple app to visualize my heartrate data in different activities.
When I started out with plotly-dash development the most confusing part for me was that I already knew plotly as a js chart lib, not as python code.
With dash you can basically write your component interactions in python. For simple usecases you would not need to write any javascript at all. Under the hood it serves a React app and renders the same js plotly lib I was familiar with.
Now let’s see the interesting parts from this github repository. Live site is available here.
Authentication
In dash applications all the necessary elements have to be rendered on startup. I have a simple and straightforward layout, one div for authenticated and one for unauthenticated items.
A single callback manages the login flow with the help of stravalib.
The auth flow was hugely inspired by AartGoossens/strava-dash-boilerplate. The difference is that they switch rendered items, but I can not live with such dash warnings and errors during development.
Static files and Clientside callbacks
Dash looks for files automagically from the assets folder. In order to serve images I could simply reference them from this assets folder, but I wanted to see if I can have more control over it.
I added a simple clientside callback just for showcase, it could be done in python side.
Simple way
You can use /assets/ prefix for your asset paths by default.
app = dash.Dash(__name__)

app.layout = html.Div([
    html.Img(src='/assets/image.png')
])
Flask Routes
You can use custom path with @app.server.route.
from flask import send_from_directory

app = dash.Dash(__name__)
@app.server.route('/static/<path>')
def serve_static(path):
    return send_from_directory('assets', path)
Custom Component
I added the custom component to the same repository for simplicity. It could live on its own.
I like that I can develop components in React.
Demo React page
The demo page is tweakable and it can showcase different usecases, similar to storybook. It’s a separate app.
{
  "scripts": {
    "build:demo": "webpack --mode production --config ./webpack.serve.config.js"
  }
}
I added a simple github actions script to deploy to github-pages. You can see it live here.
jobs:
  deploy:
    runs-on: ubuntu-latest
    strategy:
      matrix:
        node-version: [14.x]
    steps:
      - uses: actions/checkout@v1
      - name: Use Node.js ${{ matrix.node-version }}
        uses: actions/setup-node@v1
        with:
          node-version: ${{ matrix.node-version }}
      - name: Install Packages
        run: cd ./activity_selector && npm install
      - name: Build page
        run: cd ./activity_selector && npm run build:demo
      - name: Deploy to gh-pages
        uses: peaceiris/actions-gh-pages@v3
        with:
          publish_dir: ./activity_selector/dist
          github_token: ${{ secrets.GITHUB_TOKEN }}
Deploy new version
The base cookiecutter scripts do not provide good packaging script by default I usually roll my own solutions for it.
{
  "scripts": {
    "presdist": "npm run build",
    "sdist": "rm -r ./dist/; python setup.py sdist",
    "postsdist": "(. venv/bin/activate || venv\\scripts\\activate && bash ./script_postsdist.sh)",
    "sdist:version:activated": "(. venv/bin/activate || venv\\scripts\\activate && npm version patch && npm run sdist)",
    "sdist:activated": "(. venv/bin/activate || venv\\scripts\\activate && npm run sdist)"
  }
}
#!/bin/bash
## script_postsdist.sh

# assume that the virtual env has been activated and pwd is the project root directory
pushd ..
rm ./activity_selector-*.tar.gz
mv ./activity_selector/dist/activity_selector-* .
NEW_FILE=$(find . -name 'activity_selector*' -maxdepth 1 | head -1 | xargs basename)
sed -i.bak "s/activity_selector-\S*/$NEW_FILE/" ./requirements.txt
rm  ./*.bak
pip install "./$NEW_FILE"

popd || exit 1
With a simple cd activity_selector && npm run sdist:version:activated command (after dependency installs),
I can update the package in my app, it rewires the dependencies as well.
Dockerize environment
In order to see how it looks in the deploy environment in an easily reproducible way I decided to dockerize the app.
Multistage build keeps my image small, the base image and requirements.txt keeps my dependencies the same between installs.
Gunicorn provides a production grade server to deploy the app.
FROM python:3.6.13 as base

FROM base as builder
RUN mkdir /install
WORKDIR /install
COPY requirements.txt /requirements.txt
COPY ./*.tar.gz .
RUN pip install --no-cache-dir --prefix=/install --no-warn-script-location -r /requirements.txt

FROM base
COPY --from=builder /install /usr/local
WORKDIR /app
RUN mkdir -p logs

COPY ./src ./src
COPY ./assets ./assets
COPY ./logconfig.conf ./logconfig.conf

EXPOSE 5000
CMD gunicorn --bind 0.0.0.0:5000 --chdir ./src --log-config /app/logconfig.conf app:server
Development experience
I debugged my code from VSCode. Kept my config variables in a .env file in the project root folder.
{
  // Use IntelliSense to learn about possible attributes.
  // Hover to view descriptions of existing attributes.
  // For more information, visit: https://go.microsoft.com/fwlink/?linkid=830387
  "version": "0.2.0",
  "configurations": [
    {
      "name": "Start Dev Server",
      "type": "python",
      "request": "launch",
      "program": "${workspaceRoot}/src/app.py",
      "console": "integratedTerminal",
      "env": {
        "DEBUG": "true",
        "PYTHONPATH": "${workspaceRoot}/src"
      },
      "envFile": "${workspaceRoot}/.env",
      "python": "${workspaceRoot}/src/venv/bin/python",
      "justMyCode": true
    }
  ]
}
I used 3 separate terminals:
cd activity_selector && npm startto continously build the custom component. See changes live at http://0.0.0.0:55554.- One console to run VSCode debugger at
- One open console to update the component in the root app with:
pip install -e ./activity_selector
I had much fun creating these configs for the project.
Happy Coding!